
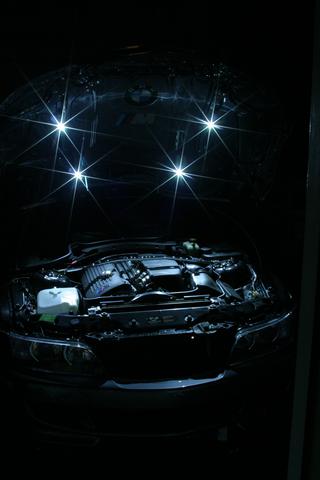
I've wanted some underhood lighting ever since I had the underside of my hood painted. The picture below is with four 1W Luxeons mounted to the underside of the hood. It's quite a bit of light.
I've yet to measure the current draw, but each Luxeon is about 1 watt. Assuming 80% efficiency in the driver module, I'm somewhere around 5 watts. It should never be a problem to leave these on for many hours on end, assuming a typical 70 amp-hour battery.
All Pictures
Proposed Wiring

Due to the LED in the toggle switches being wired to ground and pin 3 on the toggle switch, I have to have +12V to the switches (the switches can't be used to switch ground unless I forget about using the LEDs). So I need a +12V source and ground to each of the switches. That's 2 wires into the DME compartment. I'd have 6 wires going out: hot and ground for each of the LED circuits. Put those in a 6-pole connector?
If I were going to order today, I'd order these from Mouser, which includes spares/supplies:
| Part | Quantity | Description |
| 794895-1 | 2 | AMP Mini-Universal Sealed Connectors PLUG 6P |
| 174670-1 | 6 | AMP Universal MATE-N-LOK Connectors KEYING PLUG |
| 794940-1 | 2 | AMP Mini-Universal Sealed Connectors CAP 6P |
| 770987-1 | 48 | AMP Universal MATE-N-LOK Connectors PIN 22-18 AWG |
| 770988-1 | 48 | AMP Universal MATE-N-LOK Connectors SOCKET 22-18 BULK MINI UMNL |
| 794758-1 | 96 | AMP Universal MATE-N-LOK Connectors CAVITY WIRE SEAL |
| 794995-1 | 96 | AMP Universal MATE-N-LOK Connectors CAVITY PLUG SEAL |
| 794772-6 | 6 | AMP Mini-Universal Sealed Connectors INTERFACE SEAL 6P |
| 189727-1 | 1 | AMP Tools EXTRACTION TOOL |
| 794894-1 | 6 | AMP Mini-Universal Sealed Connectors PLUG 2P |
| 794896-1 | 6 | AMP Mini-Universal Sealed Connectors CAP 2P |
| 794805-1 | 6 | AMP Mini-Universal Sealed Connectors PLUG 4P |
| 794939-1 | 6 | AMP Mini-Universal Sealed Connectors CAP 4P |
| 794772-2 | 6 | AMP Mini-Universal Sealed Connectors INTERFACE SEAL 2P |
| 794772-2 | 6 | AMP Mini-Universal Sealed Connectors INTERFACE SEAL 4P |
For a grand total of about $96.00
Parts
Parts for this project were sourced from several places. The quantities of some items below are well in excess of what's required, but are consumables I use regularly. Heatshrink and braided sleeve, for example. However, some things aren't listed because I have some... bases for zip-ties, Tefzel zip ties, solder, etc. I also haven't listed shipping costs. When I'm done I'll try to tally up a total.Parts by Vendor
www.superbrightleds.com
-
Part Description P/N Qty. Unit Price Total SBL 1W Luxeon package 1W Luxeon with driver in a sealed enclosure with mounting bracket 4 $19.95 $79.80 ALM-RB Accent Light Module 3-LED accent light (SUCKS, NOT USING IT) 1 $5.49 $5.49 Total $85.29
www.cableorganizer.com
-
Part Description P/N Qty. Unit Price Total HS3A-025FT 1/4" 3:1 double-wall heatshrink, black 6 $1.50 $9.00 HS3-050FT 1/2" 3:1 heatshrink, black 6 $1.45 $8.70 HS3A-0125FT 1/8" 3:1 double-wall heatshrink, black 6 $1.17 $7.02 HS3-025FT 1/4" 3:1 heatshrink, black 6 $1.15 $6.90 BSNY025 1/4" nylon braided sleeve 50 $0.27 $13.50 BSNY0125 1/8" nylon braided sleeve 50 $0.23 $11.50 Total $56.62
www.mcmaster.com
-
Part Description P/N Qty. Unit Price Total VHB tape 3M VHB .120" 300F .75" x 15' 75935A29 1 $27.40 $27.40 fiberglass angle 2"x2" fiberglass angle, .125" thick, 3 feet' 8522K11 1 $20.75 $20.75 Total $48.15
www.mouser.com
-
Part Description P/N Qty. Unit Price Total toggle switch LED-tipped SPST 20A toggle witch 103-0004 5 $4.36 $21.80 Total $21.80
Totals by Vendor
-
Vendor Total www.superbrightleds.com $85.29 www.cableorganizer.com $56.62 www.mcmaster.com $48.15 www.mouser.com $21.80 Total $211.86
Log
- March 19, 2007
-
The LED fuses fit fine in the fusebox if I'm not also carrying them
as spares on the fusebox lid. I haven't tried replacing the spares
with LED fuses.
The APM hexseal boots will work on the LED-tipped toggle switches by just cutting the tip from the boot. It seals very snugly to the toggle shaft. I need to lubricate the shaft so the chromed cover doesn't get twisted while installing, else the LED wiring could be damaged.
-
The LED fuses fit fine in the fusebox if I'm not also carrying them
as spares on the fusebox lid. I haven't tried replacing the spares
with LED fuses.
- March 15, 2007
- I baked one of the Aircraft Spruce lights at 350F for 15 minutes, then tested that it still works. The main reason: checking if I think I can powdercoat it. Looks like the answer is 'yes'. This also means it should not have problems with underhood temperatures.
- March 14, 2007
-
I ordered APM hexseal toggle switch boots (C1131/28) from
Mouser. My hope is that these will
fit on the LED-tipped toggles I bought. I'll have to cut the tip off,
obviously. That's OK, I'm just looking to make the toggle splashproof.
Sigh, I spent a bunch of time making a long sleeved harness with a Powerlet connector on one of the Luxeon packages, only to have it roast the same as the red/orange one that roasted, as soon as I plugged it into power. It popped a 10A fuse. I'm growing very suspicious of the physical packaging of the SBL lights, and probably won't be buying any more of them. $20 isn't bad, unless you have to keep buying them. It's probably time for me to come up with my own package using K2's. I wish the LuxDrive drivers weren't so tall.
I ordered some LED-adorned ATC fuses from Waytek. The LED lights up when the fuse blows. I'm not sure they'll clear the fuse box lid, but they should. The bigger question: how much work to put a window in the fuse box lid, so I'll see it when the hood is open. The problem is the diagram on the back of the lid. Could Ron's engraver engrave the diagram on a piece of polycarbonate if I gave him the artwork?
-
I ordered APM hexseal toggle switch boots (C1131/28) from
Mouser. My hope is that these will
fit on the LED-tipped toggles I bought. I'll have to cut the tip off,
obviously. That's OK, I'm just looking to make the toggle splashproof.
- March 11, 2007
-
I installed the Powerlet socket in the e-box lid and re-installed the lid.
Right now I'm using a 10A fuse for the socket (I seem to be out of spare
15A ATC fuses unless I steal spares from the fuse box lid). 10A is plenty
for the CTEK battery charger, which has a maximum current of 3.3A. For now,
underhood work is completed. The CTEK is plugged into the new Powerlet
socket. I should have done this years ago, it makes it really easy to
put the car on the battery charger.
I'm thinking about ordering some LED-adorned ATC fuses. I can get them from Waytek. The LED lights when the fuse blows. I'm not sure they'll clear the fuse box lid, but they should. The bigger question: how much work to put a window in the fuse box lid, so I'll see it when the hood is open.
-
I installed the Powerlet socket in the e-box lid and re-installed the lid.
Right now I'm using a 10A fuse for the socket (I seem to be out of spare
15A ATC fuses unless I steal spares from the fuse box lid). 10A is plenty
for the CTEK battery charger, which has a maximum current of 3.3A. For now,
underhood work is completed. The CTEK is plugged into the new Powerlet
socket. I should have done this years ago, it makes it really easy to
put the car on the battery charger.
- March 10, 2007
- I finished all of the wiring for the Luxeon lighting under the hood. I also prepped for the wiring of the Powerlet socket. I wound up using the add-a-fuse for the fuses, since it was much smaller than adding two ATM or ATC fuse holders.
- March 7, 2007
-
The CTEK 3300 arrived today. Looks nice, we'll see how well it works.
BMW parts should be here Friday.
-
The CTEK 3300 arrived today. Looks nice, we'll see how well it works.
- March 5, 2007
- I sent a parts list to my friend at Erhard. Electrical contacts, the trim panels and the overhead light.
- March 4, 2007
-
I need to place an order at the local dealer. Note that the last 3 items
here are for my cabin lighting work, not for the underhood lighting.
            P/N              Description                         Qty  UnitPr   Total
            61.13.0.007.440  DOUBLE LEAF SPRING CONTACT 2.5MM      4   $2.18   $8.72
            61.13.0.007.437  DOUBLE LEAF SPRING CONTACT 2.5MM      4   $2.18   $8.72
            61.13.0.021.229  DOUBLE LEAF SPRING CONTACT 1.5-2.5mm  4   $2.18   $8.72
            51.45.8.397.591  TRIM PANEL FOOT CONTROLS              1  $28.32  $28.32
            51.45.8.397.454  TRIM PANEL RIGHT                      1  $21.75  $21.75
            63.31.1.383.055  INTERIOR LIGHT                        1  $15.51  $15.51
            TOTAL                                                             $91.74
I should also place my order at easternbeaver.com for the powerlet socket.
I went to the hardware today to get some decent ATM in-line fuse holders, ATM fuses (5A and 15A), and some 2-pole SAE connectors (found them in the trailer wiring section). I revised my wiring diagram so I don't use the hood switch, and hence only have 2 wires going into the e-box. The gray area represents the e-box.
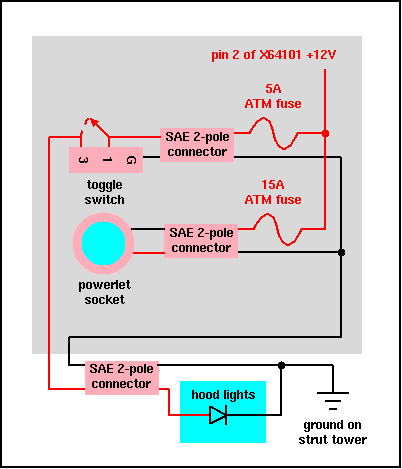
I cut the hood light wiring to length, added braided sleeve, and heatshrinked the ends. I then crimped a ring terminal on the ground, with the ground that will go into the DME box. I didn't solder it, but folded extra strand back over the crimp and then used double-wall heatshrink. I soldered the positive connection to the hood lights, heatshrinked it, then used silicone self-fusing tape to wrap both connections together. It maeks it looks like they're all going to the ground terminal, but this was the best way for me to have wires that change direction and keep the amount of messy wiring outside of the e-box to a minimum.
I placed an order at Eastern Beaver for two Powerlet sockets, 4 plugs, and both right-angle and straight boots. One of the sockets I ordered was pre-wired for low-profile installation, which I'll probably use in the cabin (hopefully one of the kickpanels).
I also ordered a CTEK 3300 battery maintainer and a tire gauge (for the MINI). The CTEK 3300 is most of the reason for the powerlet socket under the hood. I'll be hacking the ring terminal connector, adding a longer lead with a powerlet plug. USPS tracking number 9101093549590002327269.
I just noticed that Eastwood now carries dry vinyl tape for harness wrapping, 1" wide. I should order some, along with some more of Mcmaster-Carr 7643A481 (1" wide self-fusing silicone tape).
-
I need to place an order at the local dealer. Note that the last 3 items
here are for my cabin lighting work, not for the underhood lighting.
- March 3, 2007
-
I haven't yet ordered the DIN socket for the engine compartment. I
need to know if there are spare fuse locations in the fuse holder in the
e-box (P98 in the ETM). It looks like only one of the existing fuses
there gets a hot-at-all-times: fuse 205, 30A, which goes to the
injection valves relay. Ideally I'd have a 5A fuse for the LED lights,
and a 15A fuse for the DIN socket. If I can't do it in the e-box fuse
holder, I'll need in-line fuses or a small fuse box. Looking in the
fuse holder, there are 5 fuses. It looks like they're all used: F201,
F202, F203, F204, F205.
So, inline ATM fuse holders, or something like the Centech FB-4 fusebox? The Centech would be nicer but I don't need all of the outputs, nor the space consumption.
I decided to install the toggle switch for the LED lighting in the lid of the e-box. I'll take pictures later, but it's in the side of the lid, not the top. I wanted it to be easy to find in the dark, and I can get power from the unoccupied pin on the B+ junction point in the e-box (used for the automatic transmission controller on cars with an automatic transmission).
I also popped out the blanks in a grommet of the e-box partition (the one closest the passenger side), and drilled a small hole in the corresponding grommet in the e-box. This lets me bring the positive connection for the LED lights into the e-box, as well as my own ground from the ground post on the strut tower.
I scotch-brited all the paint off of the Aircraft Spruce cockpit light. I used a gray roloc pad on the die grinder. Unfortunately I took off a bit of the anodizing in the process. But I plan to powdercoat it. I tested a piece of the wire in the oven, it will take 350F without problems. I know the PCB will handle those temperatures, so now I just need to cross my fingers that whatever is on the PCB (LEDs and resistors) will not be destroyed. But if it is, I'll wind up putting a Luxeon K2 emitter in the light. Can I get a BuckToot in there?
-
I haven't yet ordered the DIN socket for the engine compartment. I
need to know if there are spare fuse locations in the fuse holder in the
e-box (P98 in the ETM). It looks like only one of the existing fuses
there gets a hot-at-all-times: fuse 205, 30A, which goes to the
injection valves relay. Ideally I'd have a 5A fuse for the LED lights,
and a 15A fuse for the DIN socket. If I can't do it in the e-box fuse
holder, I'll need in-line fuses or a small fuse box. Looking in the
fuse holder, there are 5 fuses. It looks like they're all used: F201,
F202, F203, F204, F205.
- February 28, 2007
-
I put blue loctite on the screw for the Aircraft Spruce LED light
and snugged it to what I think is reasonable (by feel). I won't be taking
it apart again unless I decide to powdercoat it.
I played with mounting it on the driver side. There isn't sufficient clearance, it will hit the air filter cover before the hood closes, whether it's folded up or not. It looks like I won't be using these mounted under the hood, or I'll only be using one. At most I now only need 2 toggle switches, and 1 is probably sufficient.
I'm stil hemming and hawing over toggle switch mounting location and method.
-
I put blue loctite on the screw for the Aircraft Spruce LED light
and snugged it to what I think is reasonable (by feel). I won't be taking
it apart again unless I decide to powdercoat it.
- February 26, 2007
-
I put two coats of steel gray metallic and one coat of clear on the
Aircarft Spruce LED light. Came out pretty nice, until I dinged it
when reassembling. Looks to me like I should try to powdercoat it,
but that means getting the LEDs out since I'm pretty sure that the
wire insulation won't take 350F even if LEDs will. I also ordered a
second one for the other side of the hood. Note that the original
torque spec for the screw in the light was 10 in/lb maximum. I've yet
to buy a torque driver in that range. This isn't a big deal, I can do
these by feel. What I need to watch out for... the washer appears to be
nylon. A typical white nylon 6/6 washer is only good to about 180F.
Fortunately, these are far enough forward in the engine compartment
to not be sitting over headers or any other part of the head. I'm not
sure what other material I'd choose. PTFE has too much thermal expansion.
Kapton would work, but I have almost no thickness choices there. Copper
would work.
The bummer is that the tolerances on the part are too close for a couple of coats of paint. The paint took damage when pivoting the light. I have a couple of options: strip the paint and leave it anodized, or take a bit of metal off and repaint or powdercoat. I want to powdercoat, but that means taking the PCB out and I suspect I'll have to destroy it to do it. It's glued in there very snugly.
I need to decide what to do about mounting the pair of toggle switches and a DIN power socket. I know I want the socket from easternbeaver.com.
-
I put two coats of steel gray metallic and one coat of clear on the
Aircarft Spruce LED light. Came out pretty nice, until I dinged it
when reassembling. Looks to me like I should try to powdercoat it,
but that means getting the LEDs out since I'm pretty sure that the
wire insulation won't take 350F even if LEDs will. I also ordered a
second one for the other side of the hood. Note that the original
torque spec for the screw in the light was 10 in/lb maximum. I've yet
to buy a torque driver in that range. This isn't a big deal, I can do
these by feel. What I need to watch out for... the washer appears to be
nylon. A typical white nylon 6/6 washer is only good to about 180F.
Fortunately, these are far enough forward in the engine compartment
to not be sitting over headers or any other part of the head. I'm not
sure what other material I'd choose. PTFE has too much thermal expansion.
Kapton would work, but I have almost no thickness choices there. Copper
would work.
- February 25, 2007
-
I bought new #6-32 screws to fix the Aircraft Spruce light.
I'm also ordering some 16A DIN sockets and three 15A DIN plugs from
outdoorgb.com. One of the
sockets is sealed to IP67, which I'll use under the hood for the CTEK
3300 battery maintainer and for emergency lighting. The others are
to check out for use with my Garmin i5 (in the M and the MINI).
I tried to order them from www.outdoorgb.com, but the order doesn't
seem to have gone through. I probably need to call them, and I can
try to arrange cheaper shipping while I'm at it.
However, they appear to just be selling the Powerlet stuff, which is available a lot of places. easternbeaver.com seems to have good options.
I heated the Aircraft Spruce light to soften the red Loctite, and removed the snapped-off remains of the #6-32 screw. No harm done. Yes, I'll be using blue Loctite, not red. :-)
-
I bought new #6-32 screws to fix the Aircraft Spruce light.
I'm also ordering some 16A DIN sockets and three 15A DIN plugs from
outdoorgb.com. One of the
sockets is sealed to IP67, which I'll use under the hood for the CTEK
3300 battery maintainer and for emergency lighting. The others are
to check out for use with my Garmin i5 (in the M and the MINI).
I tried to order them from www.outdoorgb.com, but the order doesn't
seem to have gone through. I probably need to call them, and I can
try to arrange cheaper shipping while I'm at it.
- February 21, 2007
-
I tried to take apart the Aircraft Spruce light. The screw snapped off,
they used red loctite. It's a #6-32, stainless steel.
The inner diameter of the Aircraft Spruce light is 16mm. No way to get a Luxeon Star in there. I might be able to get a Luxeon 1W emitter in there. I could get a K2 emitter in there.
-
I tried to take apart the Aircraft Spruce light. The screw snapped off,
they used red loctite. It's a #6-32, stainless steel.
- February 19, 2007
-
The braided sleeve and heatshrink arrived from
cableorganizer.com.
I'm going to try fitting the aimable light on the driver side to check for clearance. I really like the function. I know it won't clear when it's extended. Will it clear when it's folded up?
I cut the ears off of three more SBL 1W Luxeon modules. Two of these are going under the hood. I painted them body color.
I started working a bit on wiring. I'm reducing the toggle switch count so I don't have to run as many wires to the hood. For now I'm going to use 2 toggle switches, one of which will turn on the 4 SBL Luxeon packages and is expected to be my primary underhood lighting. The second toggle will turn on the Aircraft Spruce aimables, which consume less power. Speaking of the Aircraft Spruce aimable, I need to order another one or two of them. Or ditch them.
I buttoned up most of the hood wiring. All of the Luxeons are wired. I wound up soldering some connections and heatshrinking them. I basically never have my hood apart, and it's not that big a deal to make a new wiring harness for the lighting. Some of what I'm doing now is experimental, I just want it to work for a little while so I can decide if it will all stay. I don't yet know if the Luxeon packages will hold up to underhood temperatures. I sure hope they do. The maximum operating temperature is 105C (221F), and the maximum junction temperature is 135C (275F). How long will they last?
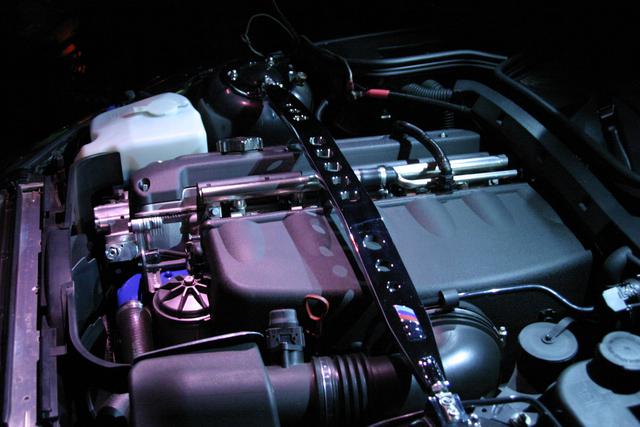
Four 1W Luxeons is a lot of light under the hood. I definitely don't need more light. The two higher ones are aimed past the front of the engine compartment, which is useful for reading sockets, dipstick, etc. It'll also be nice at Homecoming for lighting our parking lot parties. :-)
I'll try to take some more in-progress pictures tomorrow.
-
The braided sleeve and heatshrink arrived from
cableorganizer.com.
- February 17, 2007
-
I played with the cockpit light under the hood. Installed in the forwardmost
hole in the hood on the passenger side, it clears the washer jug if folded
but not if extended. Rather than roll the dice on how long before someone
closes the hood with the light extended, I should look for a smaller washer
jug.
I also mounted the toggle switches in a scrap piece of 90-degree fiberglass. I'm not very happy with the amount of effort to flip the toggles, which is of course related to their current rating. I should look for something smaller, I don't need 20A. Apem 3600NF are sealed, no LED.
There's no question that the neodymium magnet from McMaster-Carr is more than strong enough to hold one of the SBL brand Luxeon 1W packages to the hood or pretty much anything else containing iron. I don't know yet if the magnetic field is going to cause issues with the Luxeon package.
The 3-LED accent lights are ptetty useless under the hood. Not enough light, with a narrow viewing angle. they're not even sufficient for lighting the vinyl Roundel and ///M. Where would they be useful? Puddle lighting?
-
I played with the cockpit light under the hood. Installed in the forwardmost
hole in the hood on the passenger side, it clears the washer jug if folded
but not if extended. Rather than roll the dice on how long before someone
closes the hood with the light extended, I should look for a smaller washer
jug.
- February 16, 2007
- The cockpit light arrived from aircraftspruce.com.
- February 15, 2007
- The toggle switches arrived from Mouser. I was hoping they were all black, the datasheet said nothing about the material or color. They're chrome. Not a big deal. They're nice though. The 20A rating is overkill for LED lighting. The LED is internally wired, and you can choose whether it's on all the time or only on when the switch is on.
- February 11, 2007
-
I painted a pair of the SBL Luxeon packages and played with placement.
Putting them near the windshield washers seems to work well, and keeps
the wiring from getting messy.
I ordered braided sleeve and heatshrink from cableorganizer.com.
I ordered a pair of 3-LED accent lights from superbrightleds.com
If I mount the toggle switches in the engine compartment using fiberglass angle, can I mount the fiberglass to the DME compartment wall with a single M8 nutsert? McMaster-Carr P/N 97467A693 (stainless steel) would be nice. Unfortunately I can't get my nutsert tool in there.
aircraftspruce.com has some interesting map lights here. Umm, the stud will fit in the holes that already exist in my hood. Can I get a wrench in there? Probably. Will they clear what's below? I don't know. Sure would be cool to have aimable lights though. Too bad they're $52.65 each. I ordered one anyway, to check it out.
steinair.com has an interesting eyeball cockpit light.
-
I painted a pair of the SBL Luxeon packages and played with placement.
Putting them near the windshield washers seems to work well, and keeps
the wiring from getting messy.
- February 10, 2007
-
I cut the ears off the bracket of a sealed SBL 1W Luxeon package to play
with mounting some to the hood. I like it. 4 of these would be nice,
VHB'ed to the underside of the hood. I'll paint them body color first,
of course. It looks like the hood switches from open to ground when the
hood is opened. So assuming I don't have to go too far to tap, the
wiring should be easy. Where do I put the switch to turn them off
manually? The wall of the DME compartment?
In any event, I've dremel'ed the ears off of a pair of the self-contained Luxeon 1W packages. The size is manageable and I think they'll look fine once I've painted them. I ordered some toggle switches from Mouser. Bigger than I really need, but they were less than $5 each, 20A current rating, and are LED-tipped. I also ordered 2 more SBL 1W Luxeon packages and a pair of bright white 194-based LEDs to try for license plate lighting (hoping to avoid modding the license plate light housings).
I ordered a .787" diameter .197" thick neodymium magnet from McMaster-Carr (5902K65). I also ordered two types of flexible magnetic strip, and .120" thick VHB tape that's good to 300F (75935A29). I also ordered a 6' length of 1/4" thick 2.75" x 3" 90-degree fiberglass to help me finish my amplifier cover.
-
I cut the ears off the bracket of a sealed SBL 1W Luxeon package to play
with mounting some to the hood. I like it. 4 of these would be nice,
VHB'ed to the underside of the hood. I'll paint them body color first,
of course. It looks like the hood switches from open to ground when the
hood is opened. So assuming I don't have to go too far to tap, the
wiring should be easy. Where do I put the switch to turn them off
manually? The wall of the DME compartment?
Ordered
- toggle switches from Mouser
- Luxeon 1W LED SBL accent lights from superbrightleds.com
- .120" thick VHB tape that's good to 300F (75935A29) from McMaster-Carr
- braided sleeve and heatshrink from cableorganizer.com
- Powerlet plugs and sockets from Eastern Beaver
- CTEK MULTI US 3300 battery tender from AutoSport
- APM hexseal toggle switch boots (C1131/28) from Mouser
- LED-adorned ATC fuses from Waytek
Need to order
Documents
Daniel (dwm)