
Diary
- October 29, 2014
-
oil
68,941 miles. Changed oil and oil filter. I went a long time this time, to see how different my oil report looks from Blackstone. I've been fairly light on the car in the last year; no driving events, mostly just commuting (highway miles). Blackstone has been telling me for years that I should run my oil longer between changes.
-
oil
- May 14, 2013
-
oil
61,871 miles. Changed oil and oil filter.
-
oil
- January 9, 2013
- January 5, 2013
-
Detailing
I ordered four more Systainers and another rolling base to complete my envisioned detailing storage. I also created the remaining label cards for the Systainers.
-
Detailing
- May 29, 2012
-
general
I got a check engine light today. I checked the codes with the Peake tool and got 1b 76 78 5c 7d. 1b76 is "Throttle position sensor 1" and 1b78 is "Throttle position sensors, cross check". I hope this doesn't mean I need a new pedal potentiometer, since it's an expensive part (lists at around $425). 1b5c is "post-cat sensor aging, cyl. 1-3" and is a code I seem to get once a year. I still don't know what 1b7d means.
-
general
- May 28, 2012
-
Detailing
I washed the M roadster at the local coin-op car wash, and applied Wolfgang Deep Gloss Spritz Sealant after drying. I continue to like the Wolfgang Deep Gloss Spritz Sealant; it's easy to use, looks good and leaves a slick finish. I used it on my wheels too.Both cars need a full detail, but it's nice being able to squeak by for a bit while the MINI is consuming garage space for repairs.
-
Detailing
- May 21, 2012
-
tires
The crash bolts arrived. I installed one on the driver side front, which brought my camber to -2.4 degrees. Hmm... something else is amiss. Ah ha! My driver side camber plate was NOT all the way out as I thought! Sigh, I need to remember to look underneath, and do something about the fact that Michigan potholes have a tendency to scoot my camber plates negative over time. I'm now at -1.9 degrees on both sides, which is where I want to be for street driving. I haven't driven the car yet to settle things, but the total toe-in at the moment is about 1/8". I should notice much more even tire temperatures the next time I drive it. Obviously I wouldn't get to -1.9 degrees on the driver side without the crash bolt, and I believe I have a slightly bent control arm on the driver side. But I'm good for now for tire wear as long as my toe stays in range.I should note that I'm still not thrilled with my ride height. I'd like to lower the front a little bit and raise the rear a bit. I don't have much room to work with in the rear with the TC Kline setup; if I were smart, I'd go back to the KW V3 springs and struts. I should be able to get new springs from KW, and I need to send my front coilovers in for a rebuild; the front driver side was blown years ago. I need to order 6679K16 from McMaster-Carr for the KW fornt coilovers..
-
tires
- May 19, 2012
-
tires
I tweaked my front alignment to get 1/16" total toe-in. I did this all on the driver side, since I suspect that my driver side tie rod is stretched. My camber remains unchanged. It will be interesting to see how it drives and if the temperature of the inside of front tires comes down a bit.
-
tires
- May 18, 2012
-
tires
I ordered some M12 x 45mm class 10.9 bolts (1.7mm thread pitch) from McMaster-Carr to see if I can remove .5 degrees of camber from the driver side front wheel. These should be equivalent to the ones that BMW sells for this purpose. They are yellow zinc plated.
-
tires
- May 16, 2012
-
Detailing
I cleaned the winter dust from the roadster using spray-on car wash, then followed it with Wolfgang Deep Gloss Spritz Sealant. I like the Spritz Sealant. The base sealant on my car right now is almost a year old, and was long past the slippery state. The Spritz Sealant made it slick again, and was very easy to use. Towel-wise, the Griot's Spray-On Car Wash towels continue to impress me for dust removal. They're easily a step above the Chemical Guys Shaggy Fur Ball towels. I'll keep buying them from Advance Auto Parts as long as they continue offering relevant coupon codes.
-
Detailing
-
tires
I dropped off my wheels and four new Bridgestone RE-11 tires at Erhard. They should be done tomorrow. I need to drive the roadster for a little while so I can replace the exhaust on the MINI Cooper S.
- April 22, 2012
-
Detailing
I ordered five 3-packs of Griot's Spray-On Car Wash Cloths from Advance Auto Parts. I used the 'VISA' coupon code to get $30 off. With this purchase I'm fully stocked for day-to-day spray-on wash towels.
-
Detailing
- April 18, 2012
-
Detailing
The Festool Systainer 3 T-Loc for my wheel cleaning towels arrived from Amazon. I will make label cards for it later.The pegboard-mount paper towel holders also arrived from Amazon, and I've temporarily put all four of them in the single-bay garage. Two of them have Bounty paper towels, two of them have Shop Towels. I may buy more for the basement.
-
Detailing
- April 17, 2012
-
Detailing
The red Wypall microfiber towels arrived from Amazon. For the price ($9.99 for 6 towels), they seem to be nice for my intended purpose (cleaning automotive wheels).I ordered four Lehigh pegboard-mount paper towel holders.
I ordered a Festool Systainer 3 T-Loc from Amazon to hold wheel cleaning towels. This completes stack 1 of my detailing Systainers. Crude diagram to the right. 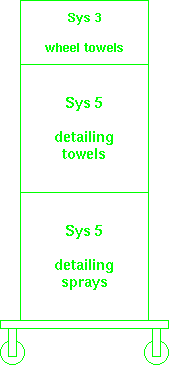
For stack 2, I will order another mobile base, another Systainer 5 T-Loc and another pair of Systainer 4 T-Loc. Crude diagram to the right. This is the same height as stack 1. 
For stack 3, I will order another mobile base, a Systainer 4 T-Loc, three Systainer 3 T-Loc and a Systainer 1 T-Loc. Crude diagram to the right. This is the same height as stacks 1 and 2. 
-
Detailing
- April 15, 2012
-
Detailing
I ordered four 6-packs of red Wypall microfiber towels from Amazon. These will be my wheel cleaning cloths. The price was too low to pass up ($9.99 for each 6-pack, free shipping via Amazon Prime). I've decided on red for wheels because it's the typical color of a shop rag, and wheels are typically the dirtiest part of my cars. I will probably have some orange towels remaining in the mix for buffing sealant from wheels. Of course I still have disposable towels for wheels.
-
Detailing
- April 11, 2012
-
Detailing
Systainer World has no Tanos mobile carts in stock and is no longer carrying them. It would've been nice for them to have removed them from their website. And not taken 5 days to inform me after I placed my order.I ordered a pair of the Festool 492388 mobile carts from Amazon. They were more expensive, and are black (which I didn't want), but otherwise exactly the same as the Tanos. Hopefully they'll arrive before the weekend (Amazon Prime 2-day shipping).
-
Detailing
- April 10, 2012
-
Detailing
Two Festool Systainer 5 T-Loc storage units arrived from Amazon. So now I have two stacks of T-Loc systainers awaiting the arrival of their mobile bases from Systainer World.I have plans for the next stack, for more detailing tools. One Systainer 4 for polish and sealant, one Systainer 3 for random orbital pads, another Systainer 3 for electric random orbitals and one Systainer 1 for clay. This works out to be the same height as the two Systainer 5 bins I'm using for towels and sprays. With the exception of washing tools/supplies (which I can keep in buckets), a pair of stacks is sufficient for me to detail cars away from home. I should be able to fit all of it plus 2 buckets in the MINI, with room to spare. It breaks down into four 16" tall units. Due to the number of separate bins, the next stack will be priciest... $295 plus the mobile base.
-
Detailing
- April 9, 2012
-
Detailing
In the interest of being able to detail the cars of friends and family, I'd like to have a pair of electric random orbitals: a 6" and a quot;. I will likely buy the Griot's versions, since I don't want to spend a lot of money for tools I won't use frequently. The Flex tools are very nice, but it's hard for me to justify the price for a tool I'll use only occasionally. Storage is an open question; I assume I can fit them both in a Systainer III, but I won't really know until I have them.The two Festool Systainer IV T-Loc storage units arrived from Amazon, a day earlier than expected.
I also received the six buckets with gamma seal lids from BayTec Containers. I mixed the colors on the buckets that I put GritGuards inside: the blue bucket with a yellow gamma seal rim and the yellow bucket with a blue gamma seal rim have GritGuards in them. The other two yellow buckets have full yellow gamma seal lids and the other two blue buckets have full blue gamma seal lids.
It's worth noting that Autogeek wants $35 plus shipping for a single bucket with gamma seal lid and GritGuard. I paid less than $15 per bucket with gamma seal lid, and already had the GritGuards which were $9 each. I saved more than $11 per bucket (plus shipping costs) versus buying directly from Autogeek. The gamma seal lids are exactly the same, made by the same company here in the U.S.A.
I removed the tags from several sets of the microfiber towels I received recently, and put them in one of the Systainer IV T-Loc containers to test fitment. It appears to me that I don't really need a Systainer V T-Loc for day-to-day towels, but we'll see when my second one arrives.
-
Detailing
- April 6, 2012
-
Detailing
I ordered two more Festool Systainer V T-Loc storage units and two Festool Systainer IV T-Loc storage units from Amazon. I ordered two Tanos Systainer mobile bases from Systainer World. One of the Systainer V T-Loc containers is for my daily detailing towels; it will go atop a Systainer V T-Loc I already have for daily detailing chemicals and one of the mobile bases. The other Systainer V T-Loc will hold air and oil filters for my cars, and will go atop one Systainer IV T-Loc with 0W40, another Systainer IV T-Loc with 10W60, all atop the second mobile base. The idea here is to make my regular car maintenance a little easier.
-
Detailing
- March 31, 2012
-
Detailing
I ordered three yellow buckets, three yellow gamma seal lids, three blue buckets and three blue gamma seal lids from BayTec Containers.
-
Detailing
- March 29, 2012
-
Detailing
I received six 24x16" Fluffer Miracle Supra Microfiber Towels, three 24x17" Big Monster Microfiber Extreme Thickness Microfiber Towels, some interior dusting brushes, a gallon of CG Speed Wipe, a Light Clay Bar, a Clay Block Kit, a pad cleaning brush, a 12-pack of Microfiber Super Towels for sealant buffing, four Sasquatch Maximus microfiber towels for interior dusting, six Shaggy Fur-Ball blue microfiber towels for day-to-day detailing and spritzing and a 3-pack of Professional Spray Bottles from Chemical Guys.
-
Detailing
- March 25, 2012
-
Detailing
I cleaned the majority of the nasties off of the outside of the winter wheels on the MINI. It looks like we're going to get sub-freezing temperatures this week, so I'm leaving them on for another week.I used the new Mother's wheel brush and the new Daytona Speed brush. These both make it a lot easier to clean wheels. The Daytona Speed brush allows you to get the inside of the barrels too, though I didn't really work on that today. I need some CarPro Iron X and Tar X to really get wheels clean without removing them from the car.
I really need another cart. At a minimum, to hold harsher cleaners like LA's Totally Awesome, engine degreaser, Simple Green, Iron X, Tar X... the stuff for wheels, undercarriage and degreasing. Having a separate cart for this would let me perform these parts of detailing more easily, and I can then put that cart away before moving on to washing the body.
I also need more of the Sterilite Stacker 7-gallon bins. I need one for interior products, one for ragtop products, and one for wheel products. I could also use one for rags. Alternatively, I could buy more Sytainers and rearrange...
-
Detailing
- March 24, 2012
-
Detailing
I ordered more supplies from Chemical Guys. Six more 24x16" Fluffer Miracle Supra Microfiber Towels, three more 24x17" Big Monster Microfiber Extreme Thickness Microfiber Towels, some interior dusting brushes, a gallon of CG Speed Wipe, a Light Clay Bar, a Clay Block Kit, a pad cleaning brush, a 12-pack of Microfiber Super Towels for sealant buffing, four Sasquatch Maximus microfiber towels for interior dusting, six Shaggy Fur-Ball blue microfiber towels for day-to-day detailing and spritzing and a 3-pack of Professional Spray Bottles. The Griot's sprayers were formerly my favorite, but the new design is crap compared to the old so I've switched to Chemical Guys.
-
Detailing
- March 23, 2012
- March 21, 2012
-
Detailing
I just realized I forgot to order some stronger wheel cleaner. I could use some of the Sonax Wheel Cleaner Full Effect, and I would like to have some CarPro Iron X rust remover and Car Pro Tar X tar remover too.
-
Detailing
- March 20, 2012
-
Detailing
303 Fabric Guard, Leatherique Prestine Clean, a Gummi Pflege stick, Detailer's Pro Series Wheel Cleaner, Detailer's Pro Series Wheel Glaze, some Wolfgang Finger Pockets, a Daytona Speed Master Wheel Brush and a 64 oz. refill of Wolfgang Deep Gloss Spritz Sealant arrived from autogeek.net.
-
Detailing
- March 19, 2012
-
Detailing
The Luxor STC211 cart arrived from Wayfair. For $100.99 with free shipping, it's a good cart for detailing. It's all plastic except the casters, so it should be essentially impervious to water and obviously will not rust. The top is not truly flat; there's a slight ridge around the edge, maybe 1/8" tall. I consider this a good thing for a detailing cart. I wanted a near-flat top to make it easier to lay some items on the top and not have a top that could hold much water. The ridge has little effect on either of those function.It went together in about 5 minutes, the only tool needed is a rubber mallet.
I previously said I could probably use another one, and I've every reason to believe it's worth buying a second one. I've put it on my wish list. This one will quickly be loaded with the intended day-to-day detailing products: spray-on car wash, detailing sprays, spritz sealant, microfiber towels, etc.
I also received the Paint Prep, 6" glass polish pads, microfiber and pad cleaner, spray-on car wash, spray-on car wash cloths and Finest Sprayers from Griot's.
Since I forget to mention it here... I also received a Festool T-Loc Systainer V container last week. I was going to use it for storage of some detailing products, but I haven't made my mind up yet. It's a fantastic container like all of the Systainers, but perhaps overkill for detailing consumables. It's not like I don't have many other things to store.
-
Detailing
- March 15, 2012
-
Detailing
What am I still missing for a full detail? 303 Fabric Guard, Leatherique Prestine Clean, Gummi Pflege, Detailer's Pro Series Wheel Cleaner, Detailer's Pro Series Wheel Glaze, some Wolfgang Finger Pockets and a Daytona Speed Master Wheel Brush. I ordered these from autogeek.net, along with a 64 oz. refill of Wolfgang Deep Gloss Spritz Sealant.I also need to replenish some supplies from Eastwood... namely the 13665 ZP undercoating kit, Extreme Chassis Black Primer and some Extreme Chassis Black Satin paint.
-
Detailing
- March 14, 2012
- March 13, 2012
-
Detailing
I ordered Paint Prep, 6" glass polish pads, microfiber and pad cleaner, spray-on car wash, spray-on car wash cloths and some Finest Sprayers from Griot's.
-
Detailing
- February 29, 2012
-
Detailing
The Mothers tire, wheel and well brush kit, the RaggTopp natural horse hair convertible top brush, the Grit Guard dual bucket washing system, a bucket seat cushion, Menzerna PO85RD polish, two Lake Country 6.5" flat gray foam pads, two 6.25" Optimum microfiber polishing pads, and two 3.25" Optimum microfiber polishing pads arrived from AutoGeek.Microfiber towels arrived from Chemical Guys: one 26x35" waffle wave drying towel with pockets, six 24x16" Fluffer Miracle Supra Microfiber Towels and three 24x17" Big Monster Microfiber Extreme Thickness Microfiber Towels.
-
Detailing
- February 23, 2012
-
Detailing
The Menzerna Intensive Polish (PO91E), Menzerna Final Polish (PO85U), Wolfgang Deep Gloss Paint Sealant 3.0, Wolfgang Deep Gloss Spritz Sealant and Grit Guard bucket grit guards arrived from autogeek.net.I ordered more stuff from autogeek.net. The Mothers tire, wheel and well brush kit, the RaggTopp natural horse hair convertible top brush, the Grit Guard dual bucket washing system, a bucket seat cushion, Menzerna PO85RD polish, two Lake Country 6.5" flat gray foam pads, two 6.25" Optimum microfiber polishing pads, and two 3.25" Optimum microfiber polishing pads. I used a coupon code that saved me $20.
I ordered some microfiber towels from Chemical Guys. I needed some new quality ones for polish and wax removal, as well as quick detailing.
-
Detailing
- February 22, 2012
-
Detailing
My order arrived from Griot's. I put most of it away in the detailing cart. It's worth noting that the regulator fitting bottoms out in the random orbital long before the NPT thread gets tight enough to seal with 2 to 3 layers of teflon tape on the threads, so the tool leaks air at that junction. I'm just going to live with it for now, but may later drop an O-ring or silicone washer in there to seal it. For the price, I like the tool and it'll be handy for my bumper covers, mirrors and other areas.
-
Detailing
- February 18, 2012
-
Detailing
I ordered a simple 3" pneumatic random orbital from Griot's. I'm assuming it's actually a Chicago Pneumatic, but that's fine. I still have a Dynabrade 3" or 3M 3" on my wish list, but the one from Griot's is small and due to being shaped like a 90-degree die grinder, will reach places that a palm orbital will not. It was also inexpensive. I ordered several 3" pads: glass polishing pads, paint polishing pads and waxing pads. I also ordered a 3" pad holder for the places where I need to use the pads by hand. I ordered some new microfiber drying towels (the Griot's ones are much better than any other I've used, and I've used MANY). Finally, I ordered some supply restock: both glass polishes, dried-on wax remover, pre-wax cleanser and vinyl/rubber dressing.One thing I forgot to order from Griot's... the magnetic paper towel holder. However, I suspect I can find it for less elsewhere.
I ordered some Wolfgang Deep Gloss Paint Sealant 3.0, Wolfgang Deep Gloss Spritz Sealant, Menzerna Intensive Polish (PO91E), Menzerna Final Polish (PO85U), and a pair of Grit Guard bucket grit guards from autogeek.net. Normally I would buy Menzerna Power Lock as my sealant, since I've been happy with their sealants for a very long time. However, I wanted to try something new, and the Wolfgang gets good reviews. I also like the fact that their Deep Gloss Spritz Sealant is a complementary product for use between full detail jobs.
I picked up some Sterilite stacker containers at Walmart today, which fit onto the lower shelf of my new detailing cart. Two 4-gallon ones will be used to store microfiber drying and general cleaning towels, and two 7-gallon ones will hold polishes, waxes, detailing spray, glass cleaner and other fluids.
I probably need to buy more paint cleaning clay. I can pick that up locally. I'd also like to order some glass cleaning clay and wheel cleaning clay from Griot's.
-
Detailing
- January 20, 2012
-
valvetrain
I ordered a 3 oz. tube of 3M 8662 and a 7.25 oz. aerosol squirt can of Permatex hi-temp silicone gasket maker (Permatex 85915) from McMaster-Carr. I'll use one of these to seal the valve cover. BMW recommends Drei Bond or the 3M 8662 that I bought, but I normally prefer using the Permatex for this type of task because the squirt can makes it easy to lay down an even bead without making a mess. These should be here on Monday.
-
valvetrain
- January 19, 2012
-
valvetrain
I received three sets of Eastern Industries feeler gauges today. One set is straight-bladed step-ground tool steel, one set is 45-degree bent flat ground tool steel, and the final set is straight stainless steel. I know I can use the 45-degree feeler gauges for the valve clearance/adjustment service, but I'm still waiting to hear from threadcheck.com about custom feeler gauges.
-
valvetrain
- January 18, 2012
-
valvetrain
The valve shim kit (BMW 11.34.0.031.525) arrived, along with the tool to install/remove them (BMW 83.30.0.493.743). The crank turning tool (BMW 83.30.0.491.056) arrived. I also received all of the gaskets for the valve clearance maintenance: the one for the cover itself (BMW 11.12.7.832.024), six spark plug hole gaskets (BMW 11.12.7.831.271), two valve cover seal washer grommets (BMW 11.12.1.437.395) and thirteen valve cover nut grommets (BMW 11.12.7.830.972).
-
valvetrain
- January 17, 2012
-
valvetrain
The valve shim kit and gasket set shipped from ECS Tuning, along with the tool to turn the engine over via the crank (83.30.0.491.056). Randy pointed out that I shouldn't need the tool, and I think he's right; my S54 is new enough that it has the hex on the end and I can just use a socket. But it's better to have the tool and not need it than need the tool and not have it. These items should arrive tomorrow or Thursday.
-
valvetrain
- January 16, 2012
-
valvetrain
I talked to Mark Koszyk at threadcheck.com today about feeler gauges from Eastern Industries. I ordered some of the off-the-shelf gauges, but I also requested a quote for 2 sets of custom gauges. These would be specifically for checking valve clearance on the S54. I want 6" long blades with a 90-degree bend about 1" from the business end, in ranges .18mm to .23mm in .01mm increments for the intake side. I want the same thing for the exhaust side, but in .28mm to .33 mm range in .01mm increments. I asked if Eastern Indsutries can make sets in very low quantities when the blade thickness is not in their offered roll stock, and he said yes. We'll see, he said he'd probably have a quote for me tomorrow. I'm expecting a setup fee due to the non-standard blade thickness, but I've no idea what it will cost. I'm working under the assumption that many of my M friends will want a set, which might offset some of the per-set cost. I know Randy will want a set, and I think I can assume at least 5 other people will want sets.Unrelated, but it looks like BMW changed the camshaft press-down tool. 83.30.0.490.959 is the new part number, and it appears to have 4 press-down points versus the 2 of the old tool. Picture thanks to Performance Technic:

-
valvetrain
- January 13, 2012
-
valvetrain
I ordered the valve shim kit and gasket set from ECS Tuning. I also ordered the tool to turn the engine over via the crank (83.30.0.491.056). I need to order some feeler gauges.
-
valvetrain
- August 28, 2011
-
oil
51,499 miles: oil and oil filter changed. Air filter replaced.
-
oil
-
audio
I topped off the water in the watercooling pump resorvoir. I've got a slow leak somewhere, but I don't have time to find it before my trip to Tennessee for Ben's funeral.
- August 22, 2010
-
audio
I removed the passenger side kick panel to figure out why there's a bad rattle coming from the 5.25" speaker behind it. It turns out that the speaker was loose in its frame, presumably just from long-term vibration. It's a twist-lock sort of set up. I removed the frame, filled it with weatherstrip adhesive, reinstalled the speaker in the frame, and cleaned up the excess that oozed out. Hopefully this cures the problem.I should order 8 more expanding nuts for the kickpanel speakers, P/N 63 17 1 367 868.
-
audio
- August 21, 2010
-
audio
I finally replaced my radio antenna that some kids had broken off last year. I had to replace the base since that had been broken. While I was at it, I replaced the grommet. So it's all new, and works fine.I addressed the issue with my subwoofer vinyl. I removed the speaker, then pulled and superglued the parts that had peeled back. Unfortunately I got some glue on the top of it in one spot that I hadn't masked with tape. Of course, I've always been unhappy with the vinyl covering; it should have been fastened better everywhere, and I'd rather have leather. Someday I'll recover it in leather. While I was at it, I cut and installed a silicone gasket for the speaker. It should be better at preventing leaks, and it'll hold up to high temperatures unlike the weatherstripping I had used in the past.
-
audio
- July 3, 2010
-
body
Last night I scraped the frame rail on the passenger side while leaving DTE Music Theater. Gosh I hate the parking there, it's always sucked for sportscars (gravel and lawn unless you show up 3 hours early). Anyway, today I cleaned up the frame rail, put a coat of Eastwood Rust Encapsulator on it, then applied 3 coats of Eastwood Rubberized Undercoating with a brush. I prefer the brush application method since there's no overspray and I have more control over the texture. Plus the brush lets me get into all gouges in the factory undercoating on the first coat without air being trapped underneath.I also put 2 light coats of high-temperature paint on the underside of part of the exhaust midsection that was scratched.
Tomorrow I'll put more rubberized undercoating on the frame rail, and then raise my rear ride height a bit. It has been too low ever since I installed the TC Kline D/A suspension.
-
body
- June 29, 2010
-
Detailing
I washed the car, clayed it, polished it and waxed it. I also cleaned the engine compartment with citrus-based degreaser and Meguiar's detailing spray.
-
Detailing
- June 26, 2010
-
fuel system
I poured a bottle of fuel system cleaner in the fuel tank. This time I used the Gumout product, which was on sale. I've used it before, it works fine and IMHO is just as trustworthy as the Techron product.
-
fuel system
- June 23, 2010
-
oil
45,050 miles: oil and filter changed.
-
oil
-
Detailing
I vacuumed and cleaned the interior.
- September 6, 2009
-
Detailing
I washed, clayed, polished and waxed the car.
-
Detailing
-
body
I wetsanded the driver side door and rear fender a bit with 1000 grit sandpaper. I then compounded it with Menzerna Power Gloss compound, polished with 3m Fine Cut, then polished with Menzerna Final Polish II. It looks better, but it's not perfect. I will likely need to have new clear put on the door. Eventually I'd like to have the whole car re-cleared with a few extra coats so I can wetsand the whole car (get rid of the factory eggshell). -
brakes
I put the BP-10 brake pads back on the car, replacing the Q pads. The Q pads glaze too easily and I'm tired of deglazing them and using Scotchbrite on the rotors.
- September 5, 2009
-
oil
41,390 miles: I changed my oil and oil filter. This turned into a huge job because my MityVac 7201 imploded under vacuum with 4.5 liters of hot dirty oil in it. There was some brake fluid cleaner mixed in since I normally pre-spray some in the MityVac to thin the oil a bit. Bad... my clearcoat was damaged on the fender and driver side door. I'll see how well I can fix it with wetsanding, compounding and polishing.
-
oil
- July 3, 2009
-
general
Code 1b5c popped up again. I cleared it again. I should probably check my long-term fuel trims.Last week, the bottom of the car snagged a fuel tank cover at a gas station. It turns out that it hit one of the longitudinal rail pieces, removing paint and undercoating. Today I cleaned it up, sprayed some rust encapsulator on it, then applied some Eastwood rubber undercoating (3 coats, brushed on).
I also tweaked the midsection heatshield, since it was rattling.
While I was under the car, I found two nuts missing from the outboard driver side muffler hanger. I put new nuts on.
-
general
- May 30, 2009
-
fuel system
Put a bottle of fuel system cleaner in the fuel tank.
-
fuel system
- May 9, 2009
-
connecting rod bearings
37,000 miles: connecting rod bearings replaced at Randy's place. They needed it; all were out of position. Oil and filter changed.
-
connecting rod bearings
- July 23, 2008
-
general
Codes 1b5c and 1be8 have returned. Time to replace the post-cat O2 sensor and look at the purge valve.
-
general
- June 25, 2008
-
general
I checked for trouble codes with the Peake today. I've got 1b86, expected since I had the cluster disconnected when doing the SGI-5 installation. I've also got 1be8 (Evaporative emissions purge valve functional check), 1b5c (AfterCat oxygen sensor aging, Cyl #1-3) and 1b7d (???).
-
general
- June 24, 2008
-
tires
My tire pressure monitor light came on again. This is twice in the last month, both times after washing the car. I checked my tire pressures and they're all good. Just to note it here, I've got both fronts at 35 psi and both rears at 33.5 psi (using the Accutire gauge). I suspect that one of the wheel speed sensor connectors is retaining water.
-
tires
- June 6, 2008
-
general
The real source of rattle was my power steering fluid resorvoir. The M6 bolt that is supposed to hold the clamp was completely missing. I don't normally have M6 hex head bolts around, only socket head cap screws. But I found a stainless M6 hex head bolt in my stainless drawer that was just long enough to work. I put blue loctite on the end of it after installing, just to try to keep it from falling out. I'd actually like a longer M6 bolt so I could put a locknut on. There's a captive nut in the band clamp, but it's very thin. I ordered some 20mm long stainless M6 hex head cap screws.
-
general
-
coolant
Changed engine coolant at 34,621 miles. Capacity if the block is drained appears to be just over 2 gallons. Given that the 50/50 ratio doesn't have to be exact, I think it could be done with a single 1-gallon jug of coolant, using a little extra water (or Water Wetter) to finish off. That's what I'll do next time instead of cracking another gallon of coolant.I then went hunting for the source of a rattle from the front of the car that's been bugging me for a while. I first checked the torque on the nuts for the front swaybar brackets. All 4 needed retorqueing, and I decided to put a second set of locknuts on each stud to act as jam nuts. I ordered M8 jamnuts and a Loctite blue stick since I can't really get the squirt bottle stuff on the studs, and putting it on the nuts doesn't help because it's all gone by the time the nut is all the way onto the stud.
- June 4, 2008
-
body
I finally installed the 4 expanding rivets that were never re-installed after the body shop work from being hit by the drunk driver. These were the ones in the brake duct areas. They gave me a few fits as usual, but they are in.
-
body
- May 20, 2008
-
Detailing
I ordered a case of Tork 520378 towels from storeseven.com. I was on my last pack. I also ordered a dispenser for them for Randy (I already have one).
-
Detailing
- May 15, 2008
-
Detailing
I used the Menzerna Power Gloss Compound on the hood, which got rid of my hard water spots. I finished it up with Intensive Polish, Final Polish II, glaze and FMJ. I also put a coat of FMJ on the rest of the car so I can drive it.
-
Detailing
- May 11, 2008
-
Detailing
I ordered Menzerna Power Gloss Compound from autogeek.net to remove the hard water spots from my hood, as well as to deal with some scratches.
-
Detailing
- May 8, 2008
-
Detailing
I clayed, polished and glazed the passenger side fenders and door. I'm still waiting for clearcoat touch-up so I can do the hood.
-
Detailing
- May 7, 2008
-
Detailing
I clayed, polished, glazed and waxed the trunk lid. I also wetsanded the deepest scratch before polishing. There are several other scratches, but I don't have time to deal with them at the moment.
-
Detailing
- May 4, 2008
-
differential
34,106 miles, differential fluid changed. 3.5 liters of Redline 80W140.
-
differential
- May 3, 2008
-
brakes
StopFlex brake lines from Classic Tube installed in the rear with Russell stainless steel 45-degree fittings on the calipers to keep the lines away from the struts.
-
brakes
- April 30, 2008
-
fuel filter
34,106 miles: New fuel filter installed. Pictures of old one cut open are here.
-
fuel filter
-
rear trailing arm bushings
New rear trailing arm bushings installed in the trailing arms (buh-bye squeaky Irelands).
- April 25, 2008
-
fuel filter
I ordered a fuel filter from the local dealer. 13.32.7.831.089, list price $59.75.
-
fuel filter
- April 24, 2008
-
tools
I ordered a Fowler bore gauge (54-646-401) from www.penntoolco.com. Order #226311.
-
tools
- April 22, 2008
-
oil
Mailed my 33,923 mile oil sample to Blackstone. Also mailed in the 29,447 mile one, which I had never sent in (oops).
-
oil
- April 18, 2008
-
oil
33,923 miles: Oil/filter changed. Air filter changed. Poured a bottle of Techron injector cleaner in the gas tank before filling up with Sunoco 94.
-
oil
- July 21, 2007
-
Transmission shift pins
Randy and I did the two service actions on my transmission today. The one for the shift catch pins, and the one for the 5th and reverse gear locking pin bushings. 5 new bushings total, 5 new sealing caps, 3 new springs and 3 new pins. I wish I would have bought a new locking pin for 5th gear; mine is clearly worn unevenly. If you're doing this work, buy new locking pins for reverse and 5th gear. FWIW, the service bulletin says you need the repair kit 23.11.7.542.726, but in reality you need two of them; there's only one bushing per kit and you need two. Also need all the right tools, which I bought (4 drifts and a small slide hammer).In stock form, all of the shift catch pins slide in the machined bore in the transmission case. I guess it's no wonder that they can develop problems with sticking in the bore; different materials with different expansion rates, and the bore doesn't really get wetted. The two forward ones were both quite dry, the rearmost one was a little wetter. The repair kit comes with 3 bushings (look to be lined with a PTFE mix), 3 new catch pins, 3 new springs, and 3 new sealiing caps.
Everything went without a hitch. Auxiliary parts needed: all exhaust fasteners to remove the midsection, and the gaskets at the header end since they're graphite and mine were pretty much toast (at 31,000 miles). Looking at them, I'm surprised more people don't develop exhaust leaks at this point. Whatever slight binder is in those appears to melt a bit over time. I didn't take pictures, you'll have to take my word for it.
-
Transmission shift pins
- April 22, 2007
-
oil
29,447 miles: Oil/filter changed. Air filter changed even though the previous one was still quite spiffy.
-
oil
- August 25, 2006
-
brakes
26,500 miles: New air filter. New brakes (Wilwood), so brake system has been flushed and filled.
-
brakes
- June 4, 2006
-
general
A prolonged power outage forced me to quit early last night.- DONE - torqued the slave cylinder into place. 22Nm.
- DONE - torqued the X-brace back into place (22Nm front bolts, 45Nm rear bolts)
- DONE - installed an M6x1 jam nut on the DME ground on the shock tower. The factory flanged nut is not a locknut, unfortunately.
- DONE - re-installed the newly painted fuel filter/regulator cover.
- DONE - cleaned and re-installed tunnel undercover.
- DONE - cleaned the inside of the wheels (road tar, etc.)
- DONE - put wheels back on car, put it back on the ground.
-
general
- June 3, 2006
-
brakes
I flushed and bled my brakes. I measured my rotor thicknesses too:Driver front: 27.58 mm Passenger front: 27.61 mm Driver rear: 19.73 mm Passenger rear: 19.62 mm I switched up my bleeding order a bit this time around. I did the driver's rear first instead of the passenger rear. The initial fluid from the passenger rear caliper was dirtier (slightly grayed) than the fluid in the driver rear caliper.
I ordered speed bleeder valves from Pelican Parts. My existing bleeder valves have rounded-off wrench flats and I need to replace them, so I might as well try these.
- DONE - flushed brake fluid, replaced with ATE gold (was formerly ATE blue).
- DONE - bled brakes.
- DONE - measured rotors, they're still well above minimum thickness.
-
brakes
-
clutch
I can't seem to get the clutch slave cylinder line disconnected from the hard line. due to the position of the flats on the hose on the topside of the mounting bracket, I had to use a crowfoot from underneath. It seems I can't get enough leverage on my 11 mm flare wrench to turn the flare. There's not a lot of room to work. With two people, someone could hold the flare wrench from above. Working alone, I don't think I can get it off without risking twisting the hard line. I'm taking a break to watch a nasty thunderstorm roll in and then I'll look at it again.
4:30PM I managed to get the clutch line off by putting a deep socket with a short extension over the end of my flare wrench for more leverage. Interesting that the orifice on the stock hose is so small. It was hard to judge from pictures, but now that I've seen in, I think I understand some of my clutch slip issues when driving at full tilt.
6:00PM after much hunting, I found the 14mm shim washers I needed for the mounting of the aftermarket clutch line in the brackets. This is just like the issue with replacing the brake lines; there's no flange on the ends of aftermarket lines. A precision shim washer is what's needed, to catch the points on the hex of the line. I'm using the same ones I used on my brake lines: 14mm ID, 20mm OD, 1mm thick. McMaster-Carr part number 98089A392.
- DONE - intake trumpets cleaned of oil film.
- DONE - measured clutch plate thickness with the BMW tool (21 2 080). I have plenty of clutch plate left.
- DONE - replaced clutch slave cylinder soft line with the one I got from Ron, and bled the slave cylinder.
- June 2, 2006
-
general
- DONE - fetch the fuse tool from under the air filter box where I dropped it last Saturday night.
- DONE - throw a coat of chassis black paint on the aluminum that covers the fuel filter and regulator.
-
general
- June 1, 2006
-
gauges
I checked as to why I've been getting odd oil pressure readings (too high). It appears to be a problem with the connector closest the pressure sender. I'll eliminate that connector, it's not needed since I can just disconnect the ring terminals from the sender.- DONE - Reconnect differential temperature sender amplifier, wrap with silicone splicing tape.
- DONE - Fix problem with oil pressure sender connector.
I'd like some #10-32 nuts for the oil pressure sender connection, I don't like the ones that came with it (they're not nuts, they're just threaded spacers). I also seem to be out of ring terminals in the right size.
-
gauges
- May 29, 2006
-
general
I got the car into the garage for poking. The first thing I started checking was electrical. All fuses in the fuse box look good, except the wiper fuse. I can't remember the last time I used my wipers. That's a 30A fuse chained from fuse 108. The DME is also powered from fuse 108. So I pulled the lower dash and checked all of the fuses in the junction box. They're all good.It's time to check the fuel pressure. I want to see if the fuel pump runs, but the relay module I need to bypass is under the center console in the back. PITA location to get to (I should move it to being behind the useless subwoofer grill). with the e-brake boot and center armrest out, I can't get to it. Center console has to come out. Oh joy.
I checked all of the fuses in the e-box, they're all good. I don't hear the fuel pump running for start, after releasing the tiny bit of residual pressure. I can't seem to find residual pressure numbers for the S54, but there was almost none when I opened the Schrader valve. That might be normal. It might also explain the occasional cold start sputter of the S54, but I usually hear the fuel pump at start. I guess it's time to yank the center console and test the fuel pump by bypassing the relay. I should check some more electrical too; anything going from the DME to the fuel pump control module?
I checked the HFM to see if it's getting voltage from the DME. I found 10.62V on pin 1, 10.35V on pin 2 (hmm, shouldn't that be 12V?), 10.69V on pin 3, 10.68V on pin 4 and 10.55V on pin 5. Hopefully this means my DME isn't dead.
2:15AM figured it out. A loose ground connection for the DME (and some other things) on the passenger side shock tower. Sigh, all that work for a loose ground. I'm guessing that on Saturday evening, I didn't notice the EML light. I ignore the DSC light most of the time since my Sport/DSC control module restores my last setting and I sometimes have DSC off on the street. The Peake tool showing no codes led me astray, but I should've known something DME-wise was up when it later showed the flashing 'E'.
Very odd that I was able to drive the car so far on Michigan roads (rough, esp. the section of M14 that is under contruction) without having any issues at all. No limp mode, no problems.
-
general
- May 28, 2006
-
general
No one around to help me get the car in the garage. However, I have no fuel pump sound... I can't remember if the system stays fully pressurized, but I suspect not since I often hear the noise at start. But if it hasn't been running... I need to check.
-
general
- May 27, 2006
-
Detailing
I put the car up on jackstands to wash the underside. It was actually quite clean already. I don't think I've had it off the ground for a cleaning since late summer of 2005. I guess what I'm doing at the spray wash is working.Unfortunately I managed to get some Simple Green in both eyes, and didn't really notice anything other than irritation until I got out from under the car. I've now got cloudy vision. Hopefully it's short-lived or I'm going to miss a social gathering tonight. :-(
I put Leatherique Rejuvenator on the driver's seat to sit in the sun while I cleaned the exterior. I thoroughly cleaned the ragtop and applied 303 Fabric Guard. I found a new door ding from this week, driver's side. Something for the tent at Homecoming (an excuse to tip a tech generously).
I used Menzerna glaze and their FMJ wax to finish things up.
-
Detailing
-
general
Car died with EML and DSC lights early AM in Southfield, MI. I was on my way home from visiting some old friends I hadn't seen in 20+ years. I turned off of Telegraph to follow a detour (the I-696 intersection is closed for construction). I hit a nasty bump and the engine died. It will not start. Cranks over but doesn't start. Peake tool won't read any codes (gives the flashing 'E').Note that earlier in the day, the car sputtered and stalled after idling for 30-60 seconds. It took 3 or 4 tries to start it again. I had just washed the underside of the car, then the exterior. I checked codes then, and found none. I assumed I had gotten water somewhere it shouldn't be. Bad assumption. But the car was fine for over 100 miles.
I had the car flatbedded home. I didn't get home until 5:30AM.
- August 11, 2005
-
Detailing
The X-pel for the front bumper cover should arrive today.
-
Detailing
- August 7, 2005
-
Detailing
My front bumper cover is being repainted on the 16th. I ordered an Xpel kit for it, as well as an Xpel kit for the rear fenders and the headlights. However, I might not use the one for the rear fenders; I have some uncut 20 mil film I could use there.I'm planning to have my hood repainted sometime after Homecoming. After that's done, I'll Xpel the hood.
-
Detailing
- July 4, 2005
-
oil
Engine oil, oil filter and air filter changed at 20,807 miles. I wanted to run the oil longer, but had to drain it for some gauge work. Oil was drained by the topsider, then the sump cover.Stainless steel braided oil pressure gauge hose replaced with a Kevlar hose and re-routed to not rub on bottom of air intake support bracket. Oil pressure sender replaced with one from ISSPRO EVA oil pressure gauge set. New ISSPRO EVA oil temperature sender installed in oil pan sump cover.
x-brace removed, cleaned and re-installed. Airbox cleaned. New intake clamps installed (they're one-time use).
I ordered an Earl's M12x1.5 to 4AN adapter to replace the adapter block on my oil filter housing, since I'm not using the temperature sender port on the adapter block anymore. Since I'm giving the adapter block to Isaac, I also ordered a 1/8 NPT plug in case he doesn't need both ports.
-
oil
- June 4, 2005
-
transmission
Transmission fluid changed at 20,035 miles. New fluid is BMW MTF-LT-2. The old fluid looked like what I expected; slightly dirtied. The drain plug had just a hint of tiny metal dust/flake in its recess. Both the drain and fill plugs felt like they were overtorqued, but there was no thread damage. I used 50 Nm when I replaced them.
-
transmission
- May 30, 2005
-
Detailing
I finished the Pristine Clean. I then washed and dried the exterior, and clayed off my cone marks from Saturday's autocross. I then waxed the car again with menzerna FMJ.Today I tried the Black Again product on my wheel well liners, and my head cover. It works well in the wheel wells, but I don't like the shininess on my head cover; I'll probably clean it off. And like other products of this type, it leaves oiliness. Maybe someday I'll find a product that leaves everything clean. I'll probably go back to using kerosene on the wheel well liners, which cleans them well but doesn't leave an oily film.
-
Detailing
- May 29, 2005
-
Detailing
I started cleaning the interior today. It was quite dirty due to not being thoroughly cleaned since the fall, and the TrackTime school at MIS yesterday (instructor and I in and out of the car many times, and it rained a couple of times). I even broke out the carpet cleaning machine for the driver's side footwell. I also applied Leatherique Rejuvenator. I got part way through cleaning it off with the Pristine Clean, I'll finish tomorrow.
-
Detailing
- May 15, 2005
-
Detailing
I washed and waxed again today. This time I used menzerna FMJ over menzerna glaze. To be honest, I didn't notice any real difference from the Meguiar's NXT. However, I do really like the menzerna polishes, they work well. I also like the new pads for the pneumatic random orbital that I bought from properautocare.com.I also used the Griot's Fine Glass Polish today. It works nicely at removing water spots that normally take a lot of elbow grease with glass cleaner and a microfiber towel.
I found a new scar on my hood. It's on the passenger side, and is vertical. It wasn't there last week. Argh, I'm guessing someone did it in the parking garage even though I usually park on the roof away from other cars. I'll need to do some touch-up and Langka this week, then re-wax that spot.
-
Detailing
- May 7, 2005
-
Detailing
I washed and waxed the car today, this time using Meguiar's NXT wax and Wheel Wax. Only the hood was polished; I'll do the rest on the next round. I did put the car on jackstands and washed the underside.
-
Detailing
- April 29, 2005
-
exhaust
H-pipe painted with high-temp paint, and oven-cured. Subframe reinstalled with Ireland Engineering polyurethane trailing arm bushings.
-
exhaust
- April 10, 2005
-
rear subframe
Ireland rear toe and camber kits installed by Randy Forbes.
-
rear subframe
- March 5, 2005
-
coolant
Engine coolant changed at 18,170 miles.
-
coolant
- November 10, 2004
-
rear subframe
Rear end pre-emptively reinforced by Randy Forbes. Rogue dual-ear differential cover installed. Eisenmann Sport exhaust installed. Differential fluid changed to Redline 75w90. Differential output seals replaced.
-
rear subframe
- September 13, 2004
-
oil
Engine oil and filter changed at 17,372 miles. Air filter replaced.
-
oil
- September 11, 2004
-
clutch pedal
Ron Stygar clutch pedal/bushing installed.
-
clutch pedal
- August 21, 2004
-
brakes
Brake fluid changed, brake lines replaced with StopStech stainless braided lines.
-
brakes
- August 7, 2004
-
brakes
Brake pads replaced with Axxis Deluxe Plus pads.
-
brakes
- May 11, 2004
-
rear subframe
Rear subframe bushings changed to Ireland Engineering polyurethane bushings.
-
rear subframe
- March 13, 2004
-
oil
Engine oil and filter changed at 13,050 miles. Air filter replaced.
-
oil
- July 25, 2003
-
oil
Engine oil and filter changed at 9,033 miles. Air filter replaced.
-
oil
- October 13, 2002
-
oil
Engine oil and filter changed at 5,557 miles.
-
oil
- July 26, 2002
-
oil
Engine oil changed at 3,405 miles.
-
oil